Tiny Training: Smart Projector tips and tricks

A couple of quick tips on using the projector:

Pen mode: why isn’t touch working to control the computer?

TL;DR; Make sure computer is on before turning on projector. Otherwise, use “Pen Mode” button on remote to switch modes.

The conference room projectors come with the ability to be used with or without a computer. If the projector gets into the wrong “mode,” you lose your ability to control the computer via touch.

If you want to control the computer via touch,  you will need the projector to be in computer mode rather than projector mode.

Unfortunately, the projector automatically goes into projector mode when it is turned on prior to turning on the computer. (It doesn’t detect a computer, so it assumes there isn’t one). Once you turn on the computer, the projector stays in projector mode, and basically acts like a monitor – no interaction with the computer via touch. And that sucks.

The best way to avoid this is to turn on the computer first. But if you don’t do that, you can fix it like this:

Touch anywhere on the screen. An icon should appear somewhere along the right side of the screen. Touch the icon, and choose the option that looks like a computer mouse superimposed over a laptop. That will put the projector back in computer mode. Then you’re back in business.

If you need to draw on the screen, you will want to use the Epson Easy Interactive Tools program. You can open this program by pressing the windows key and starting to type “Easy Interactive” and then clicking on “Easy Interactive Tools”

Projector image is offset

If you turn on the projector and the image is offset so that some of the computer image is “off screen,” you can often fix it using the “Auto” button on the remote. The projector will recalibrate and recenter the image to fit correctly.

Tiny Training: How to Reserve a Conference Room

Here’s a quick reference to reserving conference rooms in Outlook.

One-time meeting:

  • Create an appointment on your own calendar and open it.
    • Click Invite Attendees button.
      • Click Scheduling Assistant button.
        • Add room(s) using the “Add Rooms…” button.
        • Add Attendees using the “Add Attendees…” button.
    • Click Send.
    • Confirm that the room accepted your appointment.
    • Important: Whether the room accepts or not, the room name will be put in the Location field of your meeting. This does not mean the room has been reserved! Outlook automatically puts the room name in that field when the room is invited, and it does not remove it if the room declines the invitation. Always check to see if the room accepted the meeting invitation.

Recurring meeting:

  • Create an appointment on your own calendar and open it.
    • Click Invite Attendees button.
      • Click Scheduling Assistant button.
        • Add room(s) using the “Add Rooms…” button.
        • Set recurrence using the Recurrence button.
      • Click Send.
      • Confirm that the room accepted your appointment. If there are any conflicts, the room will reject all instances of the meeting, and send you an email listing the conflicts.
  • Open the appointment again, add attendees and send.
  • Important: Whether the room accepts or not, the room name will be put in the Location field of your meeting. This does not mean the room has been reserved! Outlook automatically puts the room name in that field when the room is invited, and it does not remove it if the room declines the invitation. Always check to see if the room accepted the meeting invitation.

Printable version here.

#tinytraining

LastPass: stuff you need to know

Now that you have a LastPass account…

Wait…you do have a LastPass account, don’t you? No? That’s ok, read this first, then come back.

Now that you have a LastPass account, there are a few important things to do (and to avoid) to make sure you get the most out of it while keeping the security of your passwords intact.

Here’s your initial checklist (explanations of how to do each of these follows this list):

  • Set an idle timeout in the browsers you use.
  • Set LastPass to log you out when you close your browsers.
  • Lock your computer when you leave it.

Set an idle timeout in the browsers you use, and have LastPass log out when browsers are closed:
This will make sure that you don’t stay logged on to LastPass indefinitely, which is a security risk. You’ll want to follow these steps on your computer and any computer you use LastPass on.

Click on the LastPass icon in your web browser: (Internet Explorer, Firefox, Chrome, Safari, etc:
lp-extension-button

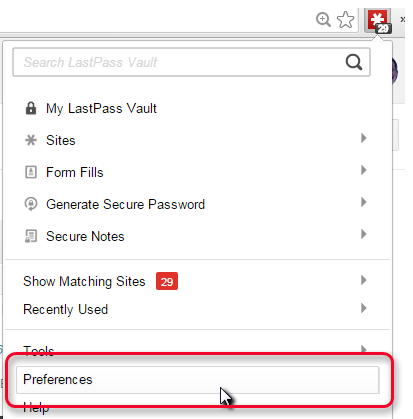
Select Preferences:

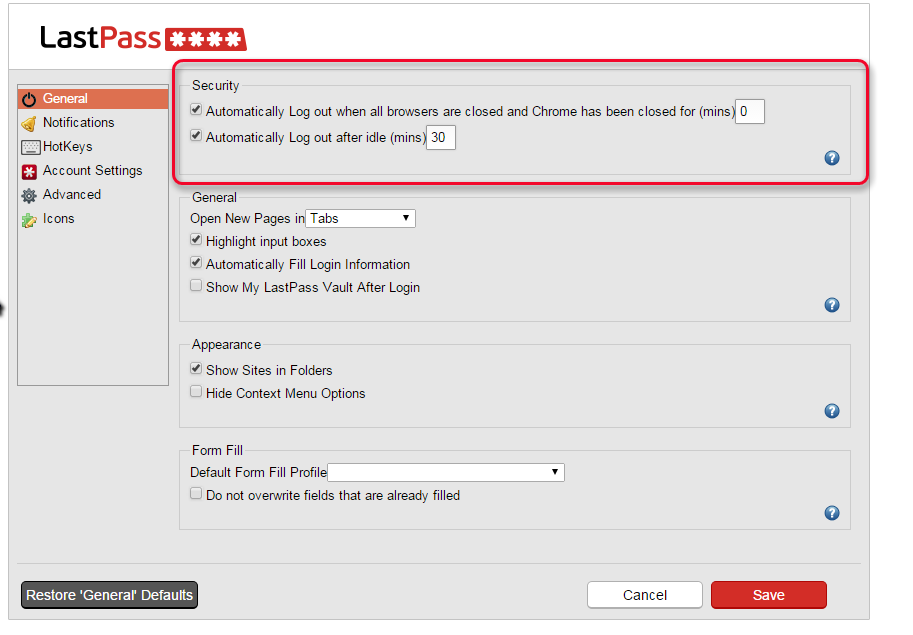
Check the two security boxes, with the values below, then click Save.lp-browser-close-idle-timeout

Lock your computer when you’re away from it.
This is pretty easy. On Windows, press the windows key + L
lock
This will lock the screen so that you have to enter your password upon returning to your computer.

On Mac it’s, um…let me Google that.
[…Google-ing…]
On a Mac it’s CTRL + SHIFT + EJECT, or in picture form:

ctrl-shift-eject

To recap, do these three things:

1 & 2) Tell LastPass to log out when you close your browser and Set an idle log out time


3) Lock your computer when you’re away from it.
windows = lock

mac = ctrl-shift-eject

Awesome. Thanks for doing that. Remember, you can’t spell “Security” without “U”!

CC BY-SA by Zeusandhera